Compiling OpenCV 4.5.2 in Windows 10
I am going to explain the steps needed to compile OpenCV 4.5.2 in Windows 10 using the source code and third party software during the compilation process. OpenCV is an open source library focused on computer vision that was firstly developed in 1999. It is one of the most used software libraries currently covering many technologies such as different libraries based on Artificial Intelligence.
Due to the developments that I made based on Computer Vision, I have noticed that there are not several tutorials explaining step by step how to install OpenCV from sources and taking advantage of the possibilities offered by compiling it with the help of different libraries such as Qt, Tesseract, HDF5… In addition, there are even fewer resources if we focus on Windows 10 and Visual Studio.
Ideally it is always advisable to use Linux, but sometimes, especially if we are talking about industrial automation, there is no choice because we need use some specific commercial or industrial software, something that fortunately is becoming increasingly rare. Let’s start!
Software used
It was used for the software compilation Visual Studio Community 16.9.4 and Framework de Microsoft.NET versión 4.8.04084. You can download it from here: https://visualstudio.microsoft.com/es/vs/community/
Cmake 3.19.6 and Cmake GUI developed with QT 5.12.1. Link for dowloading: https://cmake.org/
Git was used to download the source code from the web of several developments. Version 2.31.1.windows.1. The web for downloading it is: https://git-scm.com/
General steps to compile
Summarising the way of working with all the software, there are several steps that are repeated:
- We create two directories in a temporary folder, one to download the source code (sources) and the other to create the projects and solutions (build).
Normally we go into the sources folder and we download the source code via Git using the following command in a Windows terminal (I am using Windows Terminal and Powershell). Using Git another folder will be created inside sources with the name of the development. However, if we download the code from the web without Git, we copy all the files directly into sources folder.

We start CMake and choose the source and destination folders, which are the ones created before.
We click on Configure with the standard options.

If there is no error, it creates the first configuration with the variables that have been automatically modified, which are in red. An example is below.
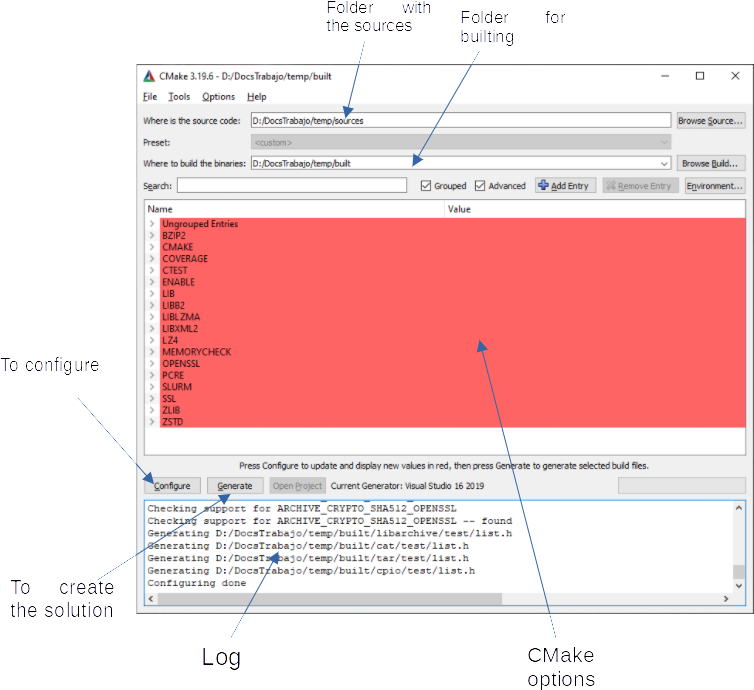
We modify the compilation options as necessary and click Configure again until there are no red lines left and there is no error. Pay attention to the log every time you click Configure, to see if there are any errors or necessary variables that have not been detected automatically.
We click Generate and the solution is created in the folder “build” with several projects.
We open Visual Studio, usually with administrator privileges if the installation is in Program Files, and we open the .sln file created. We look for the projects ALL_BUILD and INSTALL. First we compile ALL_BUILD in Debug configuration and then in Release configuration. Then we compile INSTALL, also with the two mentioned configurations. This is important, because several times both configurations are required. The files with Debug version finalise with the letter “d” as the last letter of the file name.

- We would have the program installed in the folder that CMake had configured and that we could change if we prefer another one during the configuration process.
Sofware used
I show you a list below with the third party software included during the compilation. If you click in each line you will redirect to the corresponding paragraph:
I have an AMD Ryzen so I also installed specific libraries for AMD: AOCL (AMD Optimizing CPU Libraries). It is no necessary for the compilation, but I wanted to mention that it exists specific software for AMD, because there are several toos focused on Intel processors. The link is: https://developer.amd.com/amd-aocl/
First sofware to download
In these first steps we are going to download software, that we could say, important, because their characteristics and functionality.
To download and install CUDA
We install the NVIDIA CUDA libraries if you have a graphics card that can make use of them. If not, forget about this step. We also download the cuDNN for Deep Learning. In this case you have to create an account to be able to download both libraries.
Basically there are 3 important steps:
- To install the drivers for the graphic card. We download it them from: https://www.nvidia.es/Download/index.aspx?lang=es
- To install CUDA toolkit for Windows.
- Download: https://developer.nvidia.com/cuda-downloads
- Documentation: https://docs.nvidia.com/cuda/cuda-installation-guide-microsoft-windows/index.html#introduction
The folder to install CUDA toolkit will be C:\Program Files\NVIDIA GPU Computing Toolkit\CUDA\v11.2\
- To download cuDNN libraries for Windows.
In the documentation page I put below, the whole installation process is explained, which basically consists of copying the libraries to the place where the CUDA toolkit has been installed:
Below I summarise the cuDNN installation with the version used. We unzip the zip file downloaded and this folder will be our cuDNN directory that we call it <installpath>. If it is a different version, just change the numbers
- We copy <installpath>\cuda\bin\cudnn*.dll to C:\Program Files\NVIDIA GPU Computing Toolkit\CUDA\v11.2\bin.
- We copy <installpath>\cuda\include\cudnn*.h to C:\Program Files\NVIDIA GPU Computing Toolkit\CUDA\v11.2\include.
- We copy <installpath>\cuda\lib\x64\cudnn*.lib to C:\Program Files\NVIDIA GPU Computing Toolkit\CUDA\v11.2\lib\x64.
Note that there is a strange error during the CUDA toolokit installation that is difficult to track down. If you already have software installed for your NVIDIA card, such as NVIDIA Geforce Experience, and you install the CUDA toolkit, you get an error and the installation does not continue. However, it doesn’t tell you the particular reasons for the error. The solution is to manually uninstall from Windows (Control Panel>Programs>Programs and Features) the FrameView SDK program. Once uninstalled, the CUDA toolkit installation program allows you to continue and it is installed correctly. The next time you update the NVIDIA drivers, the Frame View SDK is installed again, but this is no longer a problem.
- Variable Name: CUDA_PATH
- Variable Value: C:\Program Files\NVIDIA GPU Computing Toolkit\CUDA\v11.2
To download and install Qt
We download QT using the online installation tool from their website: https://www.qt.io/
As with NVIDIA, you have to register and install the software. Once installed, start the Maintanence tool program (C:\Qt\MaintenanceTool.exe) and check the installed options. I have used version 5.15.2, although there is a new version (6.0.3), but in case there is any incompatibility, I will keep the previous version.
The important option I have checked is Qt > Qt 5.15.2 > MSVC 2019 64-bit
I don’t use the other options, but depending on your needs or what could be interesting, you can explore the Qt tools. However, this is not the focus of this post, we just want Qt support for our work with OpenCV.
On the other hand, make a note of this directory, because we will need it when compiling OpenCV: C:\Qt\5.15.2\msvc2019_64\libmake\Qt\5\.
Dependencias
We will take the opportunity to download different types of software, compile the source code and install it, which we will use later in the compilation of OpenCV. For the most part we will follow the same steps as we discussed in the introduction. In some cases you could use Software Network (https://software-network.org/), but in this post we have unchecked the corresponding option SW_BUILD when it asks for it, as it is sometimes incompatible with Windows.
TBB. Intel Threading Building Blocks
Intel Threading Building Blocks is a C++ library developed by Intel to make it easier to write programs that use the parallelism capabilities of multi-core processors. One option is to download all the software in which they are included (Intel® oneAPI Base Toolkit), but this is more than 22 Gb. Anyway, there are more applications that can be interesting to have. Here is the link:
https://software.intel.com/content/www/us/en/develop/tools/oneapi/base-toolkit/download.html
I downloaded the sources, compile them and install them using Git. We create both folders for sources and built and within the sources directory we write in our terminal:
git clone https://github.com/oneapi-src/oneTBB
In this installation the software Intel® Software Development Emulator could be used. You can downloaded from here:
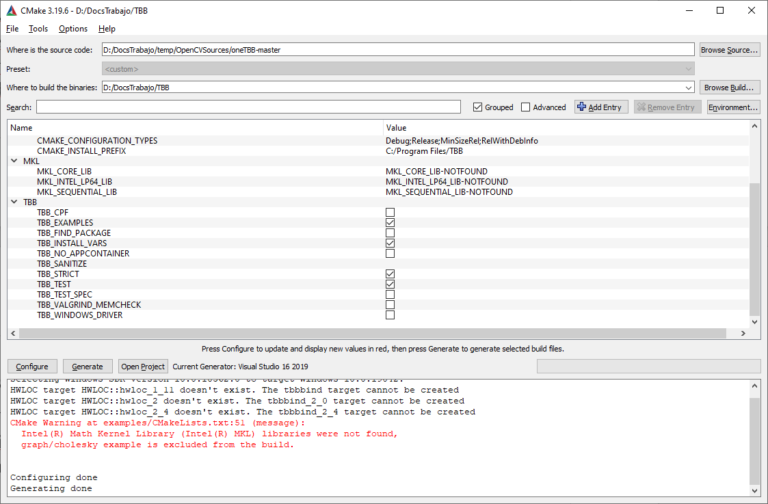
We click Generate and then open the TBB.sln solution and compile ALL_BUILD in Debug and Release configuration. Then we compile in the same way INSTALL. We have chosen C:\Program files (x86)\TBB as the installation directory. Once finished, to be able to use the libraries we create in the Windows Path, environment variables that point to the installation directory and to where the dll’s are installed. Later in our C++ program we will have to indicate the .lib and .h.
Gstreamer 1.18.3
GStreamer is a free multimedia framework written in C allowing the creation of audiovisual applications, such as video, sound, encoding, etc. The applications range from simple options such as playback or streaming, to more complex audio or video processing. We are not going to compile them, we just need to download the developer and runtime files and install them:
https://gstreamer.freedesktop.org/download/
The different folders that we will use during the compilation of OPenCV are the following. In my case I always had to do it manually as they have been never detected.

Tesseract 4.1.1
Tesseract is an optical character recognition engine for various operating systems. I have compiled Tesseract by downloading the source code and using Leptonica, Zlib, libpng, libtiff and libarchive. Let’s go through them one by one.
ZLIB 1.2.11
This is a software library used for data compression. In this case we don’t use git and download zlib from their website: https://zlib.net/
We use CMake in the same way as we have done previously. I haven’t modified any option and it doesn’t give any error or problem. We go to the target directory and open the generated solution: zlib.sln. Compile ALL_BUILD and INSTALL in Debug and Release mode. Remember that if the installation directories are in C:, we will need to open Visual Studio as Administrator so that it can create the directory and copy the files.
Installation folder: C:\Program Files (x86)\zlib\
LIBPNG 1.6.37
It is a library for reading or creating images in PNG format and the official reference library for this format. In this case we do not use git and download the sources from https://sourceforge.net/projects/libpng/
The Zlib installation is required prior to the compilatkon process. Moreover, CMake is able to locate the installation and if not, it must be installed manually. We do the same as before with all the default options.
Installation folder: C:\Program Files (x86)\libpng
LIBTIFF 4.2.0
It is a library for reading and writing tiff files that also contains command line tools for processing these files. We have the option to download the source code from https://download.osgeo.org/libtiff/ or we can use git:
git clone https://gitlab.com/libtiff/libtiff.git
Folder installation: C:/Program Files (x86)/tiff
Folder documentation: C:/Program Files (x86)/tiff/share/doc/tiff
LEPTONICA 1.80.0
It is an open source library that is widely used for image processing and analysis applications. The directories of Libpng and libtiff could not be detected, so we need to modify by hand in Cmake. The first image is CMake without modifications:

Now it has been corrected and the folders have been modified:

Folder installation: C:/Program Files (x86)/leptonica
LIBARCHIVE 3.5.1
We download the sources from https://www.libarchive.org/ and we do the same process as before.
Be careful, I have checked that could arise some errors in the location of some of the libraries. For example in ZLIB I found the directories wrong as we see in the image below, and we need to modified them with the same values that in Leptonica.

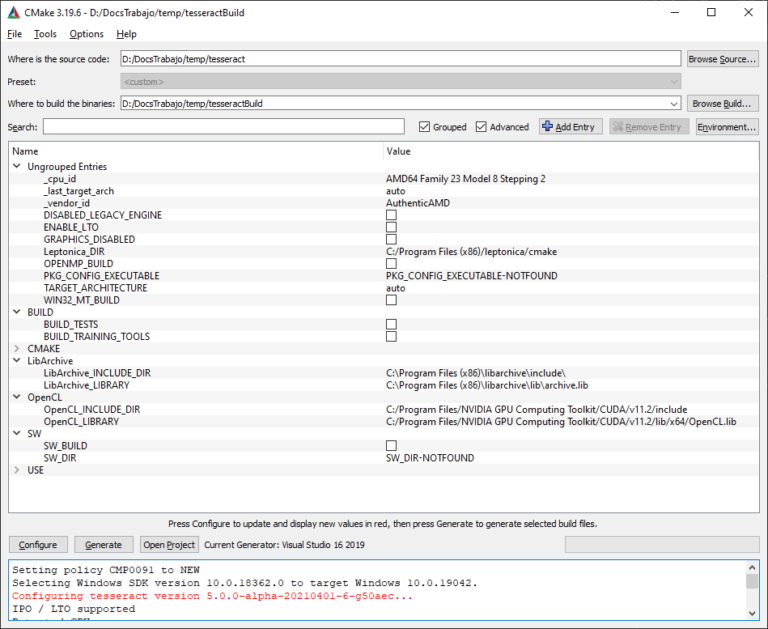
Compiling Tesseract 5.0.0
At this point we have installed several libraries that we will also use later in OpenCV, so we are going to compile Tesseract using those libraries. As we have done previously, we first download the source code via git.
git clone https://github.com/tesseract-ocr/tesseract.git
We have to take into account that if we build the “training tools”, we will get an error as doing it without sw is not supported in windows, so we uncheck that option:
× SW_BUILD
We chek these options:
√ USE_SYSTEM_ICU
√ libArchive
GLOG
It is a C++ library that implements application-level logging tools, providing APIs and macros. We have to install Gflags and Gtests beforehand. We will check that there is some software that we will not be able to include during the compilation process because it does not have a Windows version.
GFLAGS
It is a C++ library that implements the use of command line flags, which includes support for standard data types such as string and the ability to define flags in the source code in which they are being used.
We have to install Gflags and Gtests beforehand. We will also check that there is some software that we could include during the compilation process but that does not have a Windows version. We download it via git.
git clone https://github.com/gflags/gflags.git
I checked in CMake:
√ BUILD_SHARED_LIBS
We do as in previous compiations and we compile ALL_BUILD and INSTALL in the solution generated.

GTEST
Google Test is a unit testing library for the C++ programming language, based on the xUnit architecture. The first step is to download via Git:
git clone https://github.com/google/googletest.git
I checked:
√ BUILD_SHARED_LIBS
√ gtest_build_samples
On the other hand, I have uninstalled the component “Test Adapter for Google Test” in Visual Studio, just in case there could be some kind of incompatibility when installing the same component, perhaps with another version.
Compiling GLOG
Once the above software is installed, we download the GLog source code via git:
git clone https://github.com/google/glog.git
I unchecked in CMake:
× WITH_UNWIND
The variables in the gflags installation folder, gflags_DIR, were detected automatically but I had to set the Gtest variables manually. If you have changed the directory you will have to update it with your own.

Doxygen y Graphviz
Doxygen is a documentation generator for different programming languages, while Graphviz is a set of software tools used for the design of diagrams. In this case we only need to install the binaries from the web and install them, which can then be used to create documentation of the developments made.
- Doxygen: https://www.doxygen.nl/index.html
- Graphviz: https://graphviz.org/download/
HDF5 1.12.0
HDF (Hierarchical Data Format) is a set of file formats specifically designed to store and organise large amounts of data.
We download the sources from https://www.hdfgroup.org/downloads/hdf5/source-code/ and we use CMake as always. We need to install JDK previously, so we download it from https://www.oracle.com/java/technologies/javase-jdk16-downloads.html
We checked
√ HDF5_ENABLE_Z_LIB_SUPPORT
Unchecked.
× HDF5_TEST_FORTRAN y JAVA
The only strange thing is that the ZLIB_DIR variable was impossible of updating properly, even manually. However other folders had no problem.
Folder installation: C:/Program Files/HDF_Group/HDF5/1.12.0

EIGEN 3.3.9
It is a high-level C++ library for linear algebra, matrix and vector operations, geometric transformations and related algorithms. We download the EIGEN libraries from https://eigen.tuxfamily.org/index.php?title=Main_Page
Qt could be used in this case, however it is only supported in an older version of Qt than the one we are using. The problem is detected automatically.
Folder installation: C:/Program Files (x86)/Eigen3
OPENBLAS 0.3.13
It is an open source implementation of the BLAS and LAPACK APIs with many optimisations for specific processor types. We use git to download the source code.
git clone https://github.com/xianyi/OpenBlas.git
The website is https://www.openblas.net/
Folder installation: C:/Program Files (x86)/OpenBLAS
During configuration we see that the use of Cmake is experimental at the moment. However, by keeping the default options, we have not found any problems when compiling.
VTK 9.0.1
VTK (Visualization Toolki) is an open source software for manipulating and displaying scientific data. It has 3D rendering tools, as well as a number of widgets for 3D interaction and 2D graphing capabilities. The website: https://vtk.org/
we use git to download the source:
git clone https://gitlab.kitware.com/vtk/vtk.git
We check the next variables:
√ VTK_MODULE_USE_EXTERNAL_VTK_eigen
√ VTK_MODULE_USE_EXTERNAL_VTK_hdf5
√ VTK_MODULE_USE_EXTERNAL_VTK_png
√ VTK_MODULE_USE_EXTERNAL_VTK_tiff
√ VTK_MODULE_USE_EXTERNAL_VTK_zlib
√ VTK_USE_CUDA
Checking these variables will give us several errors with png, Eigen3, tiff and HDF5, so we modify the variables of the software we have already installed. In the case of png and tiff we use the values we have used with leptonica and for HDF5:

We fill Eigen3_INCLUDE_DIR with the next value:
C:/Program Files (x86)/Eigen3/include/eigen3
We also modify the next variables to obtain Qt support.

Once we have modified everything, we click on Configure. We will have an error because of Qt, but this is not a problem (we will also have it with OpenCV later).
We fill in the variable Qt5_DIR with this value C:\Qt\5.15.2\msvc2019_64\lib\cmake\Qt5\
In addition, maybe you can find this error, but in the same CMake log you wil find the solution:
CMake Error at ThirdParty/vtkm/vtkvtkm/CMakeLists.txt:2 (message): VTKm requested, but the VTKm submodule is not initialized. Please run ‘git
submodule update –init –recursive’ in the source directory.
So we go into the source folder through a terminal and we write the next command:
git submodule update –init –recursive
It could arise a warning in the log that we can fix if we fill in the variable DUMPBIN_EXECUTABLE with this value:
C:/Program Files (x86)/Microsoft Visual Studio/2019/Community/VC/Tools/MSVC/14.28.29910/bin/Hostx64/x64/dumpbin.exe
We click Configure the needed times until we do not have any red line. As always, we click Generate, we open the solution with Visual Studio and we compile it.
Folder installation: C:/Program Files (x86)/VTK
Compiling OPENCV
We are about to compile and install OpenCV with the support of the software we have compiled and installed in the previous steps. As this is the important part, we will explain step by step, as well as the options used.
Downloading OpenCV
We download OpenCV and OpenCV modules using Git in their respective folders:
git clone https://github.com/opencv/opencv.git
git clone https://github.com/opencv/opencv_contrib.git
We already have the OpenCV source code and the extra_modules downloaded in our sources directory. We choose, as we have done before, the source code folders and where the generated solutions will be.

We click on Configure and we see that it already finds quite a few elements, but it is necessary to configure others manually as well as to mark different configurations. You can see my log if you click in this link Log first configure. Let’s start:

Ungrouped Entries
We leave everything as it is and we check that it locates the Eigen and VTK directories.

BLAS
We haven’t installed it, but if you want to include it, it could be possible. I didn’t do it at first.
BUILD
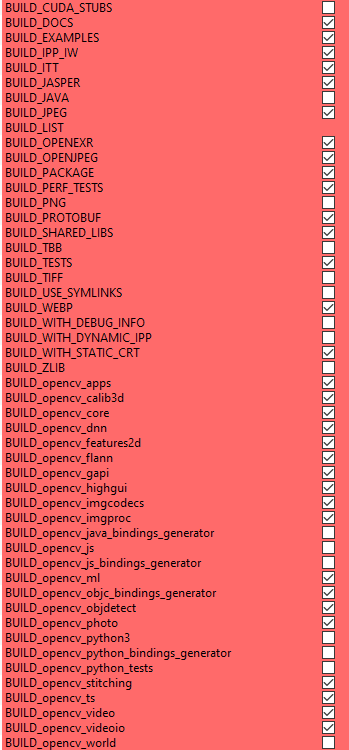
We check the next options:
√ BUILD_DOCS
√ BUILD_EXAMPLES
We uncheck:
× BUILD_PNG. We already had done the compilation and installation.
× BUILD_TIFF. The same reason as before.
× BUILD_ZLIB. The same reason as before.
× BUILD_JAVA. I will not use. It could be checked if yoy want.
× BUILD_opencv_java_bindings_generator. The same reason.
× BULD_opencv_js_bindings_generator
If we don’t want to have Python installed, we have to uncheck the corresponding boxes. I have unchecked them as I am only interested in having the C++ version.
× BUILD_opencv_python3
× BUILD_opencv_python_bindings_generator
× BUILD_opencv_python_tests
CMAKE
We can see that the installation directory will be D:/DocsWork/OpenCVBuilt/install, which we can modify with the directory where we want to have the libraries installed..
GSTREAMER
Normally it does not detect anything so we fill in it manually. Remember that the directories are:
INSTALL
We check:
√ INSTALL_C_EXAMPLES
OPENCV
We check:
√ OPENCV_DNN_CUDA.
Moreover, we fill in OPENCV_EXTRA_MODULES_PATH with the folder in which we downloaded before:
<your own folder>/opencv_contrib/modules
OPENBLAS
It has not detected anything, so we cover it manually:
WITH
We uncheck:
× WITH_1394, I will not use it.
We check:
√ WITH_CUDA
√ WITH_OPENGL
√ WITH_QT
√ WITH_TBB
Last steps
For now we don’t modify anything else and click Configure again. We will probably get a Qt error because it does not find the directory but there is no problem. We go to Ungrouped Entries and in Qt5_DIR we fill in it with the value: C:\Qt5.15.2\msvc2019_64\libmake\Qt5
We also check:
√ WITH_NVCUVID
We take the oportunity and we note that CMake did not detect the PNG y TIFF libraries, so we modify them:

We click again on Configure and we should not have any error. We check the log and the libraries that have been detected. For example, some installations have been detected automatically:
Gflags
Glog
Leptonica
Tesseract
However, HDF5 has not been detected, so we modify it manually:

We also check:
√ OpenCV_DOCS_HAVE_DOT
We click on Configure and we obtain a new red line:
Ok!, this is the last time in which we click again on Configure. You can ckeck my own log if you want to take a look: Log last configure Now, everything should be ok, without red lines or errors. The last step is to click on Generate and we create the solution.
We open the solution in VisualStudio. In this case it would not be necessary to start VS as Administrator if the installation directory is not located in Program Files. We can see that there are 722 projects open and loaded.

Again we do the same process, but now it will take much longer than in previous builds. We compile ALL_BUILD in debug and release configuration and do the same with INSTALL, which will be placed in the CMakeTargets folder. Be patient as it will take several hours. For example, in my case, it has taken about 4 hours each compilation of ALL_BUILD. You might think at some point that you are in a kind of infinite loop because of the log, but no problem, let it compile and you do not stop Visual Studio.
If we have not had any error (I hope and if not, you can comment) we should have everything installed in the directory we have chosen. Congratulations!
PROGRAM EXAMPLE
At this point, let’s check that there is no problem with the installation by doing a small example. First we have to modify the Windows Path so that it points to directories with dll libraries that our future programs will use.
TBB: C:\Program Files\TBB\bin
OpenCV: D:\DocsTrabajo\OpenCVInstall\x64\vc16\bin
Graphviz: C:\Program Files\Graphviz\bin
Qt_DIR: C:\Qt\5.15.2\msvc2019_64\bin
gstreamer: C:\Program Files (x86)\gstreamer\1.0\msvc_x86_64\bin
zlib: C:\Program Files (x86)\zlib\bin
CUDA: C:\Program Files\NVIDIA GPU Computing Toolkit\CUDA\v11.2
We open Visual Studio and we create a console application in C++.
We have to configure Visual Studio to tell it where the include and *.lib folders are. Right click on our project and go to properties. In VC++ Directories we choose the include directory of our OpenCV.

We also need to configure .lib files folder.

In addition, we configure the linker to tell the libraries we use. In the screenshot below I have write all of them, but for the test example it is not necessary. You can note that in my case. I’m using the Debug configuration, hence the name of the dependencies end in d.

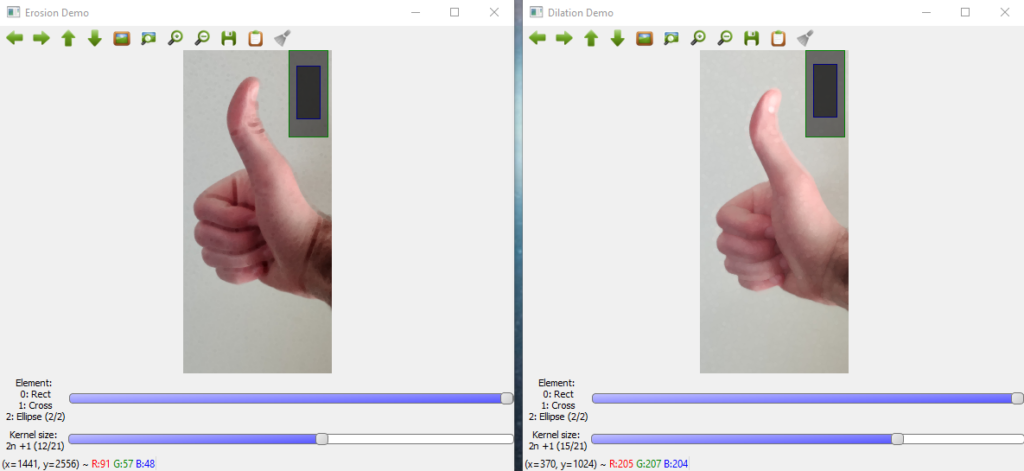
We copy the following code into the cpp file created by Visual Studio. It is based on the erode and dilation example from the OpenCV website.
#include “opencv2/imgproc.hpp”
#include “opencv2/highgui.hpp”
#include <iostream>
using namespace cv;
using namespace std;
Mat src, erosion_dst, dilation_dst;
int erosion_elem = 0;
int erosion_size = 0;
int dilation_elem = 0;
int dilation_size = 0;
int const max_elem = 2;
int const max_kernel_size = 21;
void Erosion(int, void*);
void Dilation(int, void*);
Mat ReadData();
int main(){
src = ReadData();
namedWindow(“Erosion Demo”, WINDOW_NORMAL);
namedWindow(“Dilation Demo”, WINDOW_NORMAL);
moveWindow(“Dilation Demo”, src.cols, 0);
createTrackbar(“Element:\n 0: Rect \n 1: Cross \n 2: Ellipse”, “Erosion Demo”,
&erosion_elem, max_elem,
Erosion);
createTrackbar(“Kernel size:\n 2n +1”, “Erosion Demo”,
&erosion_size, max_kernel_size,
Erosion);
createTrackbar(“Element:\n 0: Rect \n 1: Cross \n 2: Ellipse”, “Dilation Demo”,
&dilation_elem, max_elem,
Dilation);
createTrackbar(“Kernel size:\n 2n +1”, “Dilation Demo”,
&dilation_size, max_kernel_size,
Dilation);
Erosion(0, 0);
Dilation(0, 0);
waitKey(0);
return 0;
}
void Erosion(int, void*){
int erosion_type = 0;
if (erosion_elem == 0) { erosion_type = MORPH_RECT; }
else if (erosion_elem == 1) { erosion_type = MORPH_CROSS; }
else if (erosion_elem == 2) { erosion_type = MORPH_ELLIPSE; }
Mat element = getStructuringElement(erosion_type,
Size(2 * erosion_size + 1, 2 * erosion_size + 1),
Point(erosion_size, erosion_size));
erode(src, erosion_dst, element);
imshow(“Erosion Demo”, erosion_dst);
}
void Dilation(int, void*){
int dilation_type = 0;
if (dilation_elem == 0) { dilation_type = MORPH_RECT; }
else if (dilation_elem == 1) { dilation_type = MORPH_CROSS; }
else if (dilation_elem == 2) { dilation_type = MORPH_ELLIPSE; }
Mat element = getStructuringElement(dilation_type,
Size(2 * dilation_size + 1, 2 * dilation_size + 1),
Point(dilation_size, dilation_size));
dilate(src, dilation_dst, element);
imshow(“Dilation Demo”, dilation_dst);
}
Mat ReadData(){
Mat I;
cout << “Read Done.” << endl;
// Read the image file
I = imread(“D:/images/ThumbsUp.jpg”, IMREAD_COLOR); // Read the file
// Check for failure
if (I.empty())
{
cout << “Could not open or find the image” << endl;
cin.get(); //wait for any key press
}
else
{
cout << “Loading input image: ” << endl;
}
return I;
}
We compile our project and run the exe. We can also debug it from Visual Studio itself. You need to modify in the ReadData funcition (línea 84) the file image route with your own file. As we have compiled with Qt support, the windows shown have more functionality than if we compiled without Qt support.
And so far this tutorial with the compilation of OpenCV 4.5.2 with support for multiple tools on Windows 10. I hope that it had been fruitful and useful for all of you. Have you had any errors during the process? Have you used other software? Leave comments so that we can learn all of us about the tools that OpenCV provides us with and take advantage of its full potential.